How to Make a DIY Dog Car Seat Cover


Details
Details
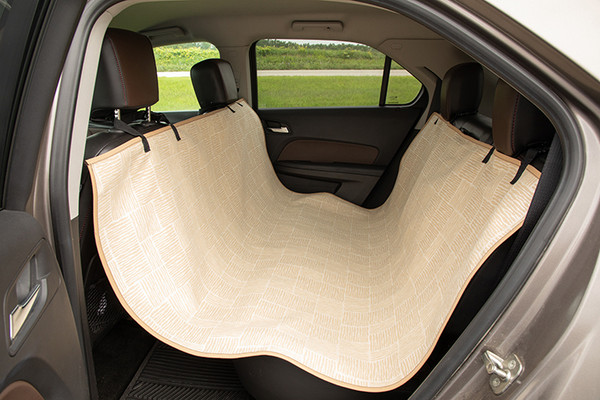
A DIY dog car seat cover is a great thing to have if you like to take your pets on road trips, to the vet, the park or anywhere else but you hate getting pet hair and dirt on your back seat upholstery. This easy-to-make fabric hammock covers your entire back seat and secures to your car's headrests with buckles. While store-bought pet hammocks can be expensive, you can easily make your own custom-sized, great-looking car hammock to keep pet hair, dirt, scratches and scuffs off of your car seats. We’ll walk you through the process!
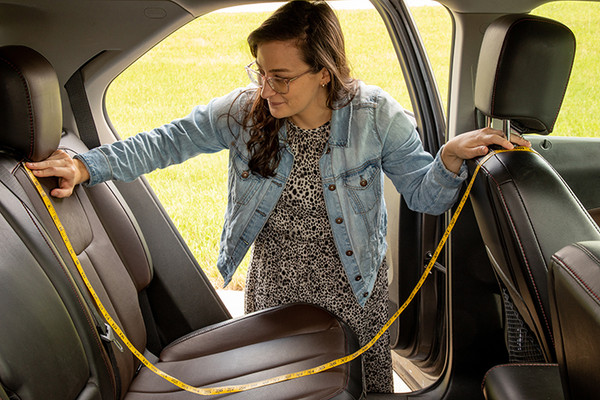
1. Measure the length of your car's backseat along the widest part. Next, measure from the bottom of your backseat headrest to bottom of the front seat headrest in the U shape of the hammock.
2. Measure around each of your car’s four headrests to determine how much webbing is needed. Add 5 extra inches to each of these measurements to account for your buckles later as seen in step 7. If you do not want to use buckles, you can add even more inches to your measurement and instead plan to make large webbing loops that will go over your headrests.
3. Cut your fabric to size depending on your measurements. Our hammock measures 50 by 60 inches. The fabric we’ve chosen is synthetic, which means we can cut it with a hotknife to seal the edges and prevent fraying. You can also use scissors, but if you do that, you’ll need to finish the edges by binding them, as described in step 4.
Tip: We recommend using a fabric with high abrasion resistance (being easy to clean is also a plus). Some of our recommended brands include Sunbrella® Upholstery, Bella-Dura®, P/Kaufmann Outdoor Performance and Fortress® Performance. Visit our blog, “What Is a Fabric Wear Rating?” (#300100XHT) for more information on abrasion resistance in fabric.
4. If you do not own a hotknife, you can finish the edges of your fabric with binding or fold over and sew the edges to prevent fraying. See our blog, “Learning to Sew Part 4: How to Finish Edges” (#200624XHT) to learn how to do this. Even if you do cut and seal your fabric with a hotknife, it will look far better if you add binding to the entire perimeter, although this will slightly increase the cost of your project.
5. Take your fabric out to your car. Then measure and mark with a marking pencil on each edge where the headrest will be attached with webbing. Refer back to your headrest measurements and cut your webbing into four pieces with a hotknife or scissors.
6. On the areas you’ve marked on your fabric according to your headrest placement, you can now sew your four webbing loops. You’ll want to attach them in a U-shape using a box X stitch with 2 inches of webbing sewn to the fabric. Check out our blog, “How to Properly Sew a Box X Stitch” (#300335XHT) to see how to do this. If you do not want to add buckles to these webbing loops, your project is finished! Continue to step 7 if you do want to add buckles. Adding buckles makes it easier to quickly secure or remove your car seat cover.
7. On one side of your finished webbing loops, cut 5 inches from one of the ends. Do not cut both sides of each webbing loop, just one. Now it’s time to attach your buckles to each loop. To do this, thread your webbing ends through each part of the male and female ends of the buckle, fold the edges over 2 inches and sew them together, once again using a box X stitch.
8. Take it out to your car and secure it in the backseat. If you have any problems, you can use a seam ripper to remove seams and resew your webbing. Enjoy!
If you find that your pet is often wet, drools a lot, or needs a hammock with more padding, you can sew old towels or polyester batting between two layers of fabric to create a double-layered hammock instead of the one layer of fabric that we used.
How did your hammock turn out? We’d love to see photos in the comments below. And if you’re not taking your canine companion on a car trip, you can also lay your hammock out on the ground to serve as a picnic blanket (as long as it's free of dog hair of course)! Thanks for choosing Sailrite for all your DIY needs.